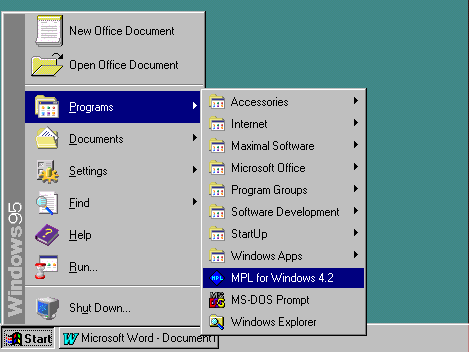
Figure 3.1: The MPL for Windows in the Start Menu
There are several ways you can start MPL in Windows. The two most common are either through the Start menu or by creating a shortcut for it.
The installation program for MPL created an entry in the Start menu under Programs | MPL for Windows. To access it click the Start button from the task bar that appears along the bottom of the Windows screen. The MPL for Windows start menu entry is shown here in Figure 3.1:
Figure 3.1: The MPL for Windows in the Start Menu
You can create a shortcut for MPL by clicking on the right mouse button anywhere on the desktop. You will be examplesented with a pop-up menu where you choose New and then Shortcut. This will start the Create Shortcut Wizard. In the input box enter the full path for the MPL program. If you do not know the path you can exampless the Browse button to locate MPL in your system. After entering the path, exampless Next to continue. In the next window enter the name of the shortcut and then exampless Finish. The new shortcut will now be created on the desktop.
You can also set MPL up so it will automatically open a specific model file when starting. There is an example of this in Figure 3.1 where you can see the MPL icon with the caption 'Planning.mpl'. To see how this is set up, create a shortcut for MPL on the desktop and then use the right mouse button to choose properties for it. This will bring up the Properties dialog box. Select the Shortcut tab and in the Target input box enter the following:
c:\mplwin4\mplwin42.exe planning.mpl
By giving the name of the model file 'planning.mpl' as an argument after the program name on the command line, MPL will automatically open the file when it is started. To create another icon that opens a different file, first duplicate the icon by dragging it with the right mouse button and select Copy Here. Then you can change the name of the model file in the command line by going again into the Properties dialog box.
MPL was not only designed to help the model developer to create optimization models, but also to make it easy to delpoy the model by embedding it into business applications. With the introduction of the Optimax 200 Component Library, MPL models can now be easily embedded into end-user applications such as Excel and Access from Microsoft Office, using programming languages such as Visual Basic and C++. This allows model developers whose expertise lies in developing models, to effectively work with and deliver models to the IT professionals who can then focus on working in databases and building graphical user interfaces and end-user applications. Please contact Maximal for more details on the OptiMax 2000 Component Library.
MPL can be run directly from other windows applications in run-time mode. This will let MPL solve a model from the other application without entering the integrated modeling system. MPL is run in run-time mode by entering the command SOLVE to the command line before the name of the model.
c:\mplwin4\mplwin42.exe SOLVE capri.mpl
This will direct MPL to read the model file that follows and solve the model directly. You can also ask MPL to generate an input file, such as MPS, in run-time mode, by entering the command GENERATE to the command line followed by the MPS filename.
c:\mplwin4\mplwin42.exe GENERATE capri.mps
This will direct MPL to read the model file, with the filename that follows, using the extension �.mpl� and then generate the input file you requested. MPL will determine which type of input file to generate from the file extension used.
Many end-user applications for Windows, such as databases and sexampleadsheets, have a macro language that lets you execute other programs from a command line. This allows you to use the application as a front-end that handles the data entry and management tasks for your project and then call MPL directly from the application to solve the model. Then, using the database features of MPL, you can create an application around your model where the end-user never has to know how to use MPL.
The way you can call MPL from other applications depends on which software you are using. The most common applications that are used include Visual Basic, C/C++, and databases such as MS Access. In most cases this is accomplished by making a Win32 call to CreateProcess. Other programs will possibly have functions like WinExec or Shell. In many cases, you will want your calling application to wait until MPL and the solver are finished before continuing. Here is an example of a WinExecWait function that will first call CreateProcess and then use the Win32 function WaitForSingleObject.
    int WinExecWait(LPSTR CommandLine)
    {
        UINT Result;
        DWORD dwExitCode;
        STARTUPINFO StartupInfo = {0};
        PROCESS_INFORMATION ProcessInfo;

        StartupInfo.cb = sizeof(STARTUPINFO);
        Result = CreateProcess(NULL,CommandLine,NULL,NULL,FALSE,0,NULL,NULL,
                           &StartupInfo,&ProcessInfo);
        if (!Result)
           return WE_SOMEERROR;
        else {
           CloseHandle(ProcessInfo.hThread);
           if (WaitForSingleObject(ProcessInfo.hProcess, INFINITE) !=
    WAIT_FAILED) {
              GetExitCodeProcess(ProcessInfo.hProcess,&dwExitCode);
           }
           CloseHandle(ProcessInfo.hProcess);
           return WE_RANOK;
       }
    }
This WinExecWait function can now be called using a command line that runs MPL in the run-time mode. For example:
WinExecWait("c:\\mplwin4\\mplwin42.exe SOLVE capri.mpl");
Visual Basic supports a Shell function that allows you to run external programs, such as MPL, but it does not wait for the program to finish. If you need a function that waits until MPL finishes, Visual Basic supports Win32 function calls and, therefore, will be very similar to the above example. Please contact Maximal Software if you need sample copy of WinExecWait for Visual Basic.